Monday, April 22, 2013

Unisex Chevron Baby Shower + FREE Printables!

My favorite part of my day job is that I'm in charge of planning parties and events for the floor.  So what that means, essentially, is that I get paid to browse Pinterest for ideas, decorate, and all of my supplies are paid for!

One of my favorite people on the floor is having her first child next month - let's call her MTB - so when her supervisor asked me to help plan a shower I was stoked!

She is not your typical baby animals, pastel pink and blue, cutesy type of mom-to-be, so I knew a standard baby shower wasn't going to work for her.  I'm sure she would have appreciated anything we did, but we wanted it to scream her name when you walked in the door.


When she was telling me about her neutral with pops of color nursery, inspiration was born!

These are the colors I chose for the shower.


 And the invite.

Font, Font


And then I whipped up a little baby shower banner.  Download your own here!


Some bright-colored tassles.

Tutorial


Some big and bright poofs.


Tutorial

And PINWHEELS!  I'll detail in another post how I made these.


My co-conspirator, Joanie, brought/made these super cute Kewpie flowers.


Did I mention MTB isn't finding out what she's having?  And since no shower is complete without a game of sorts, I used that and came up with this "Bow or Beau" bulletin board game.  Since you guys are my favorite people on earth, I'm also sharing the headers for the bulletin board with you here.


Looks like she's having a boy!

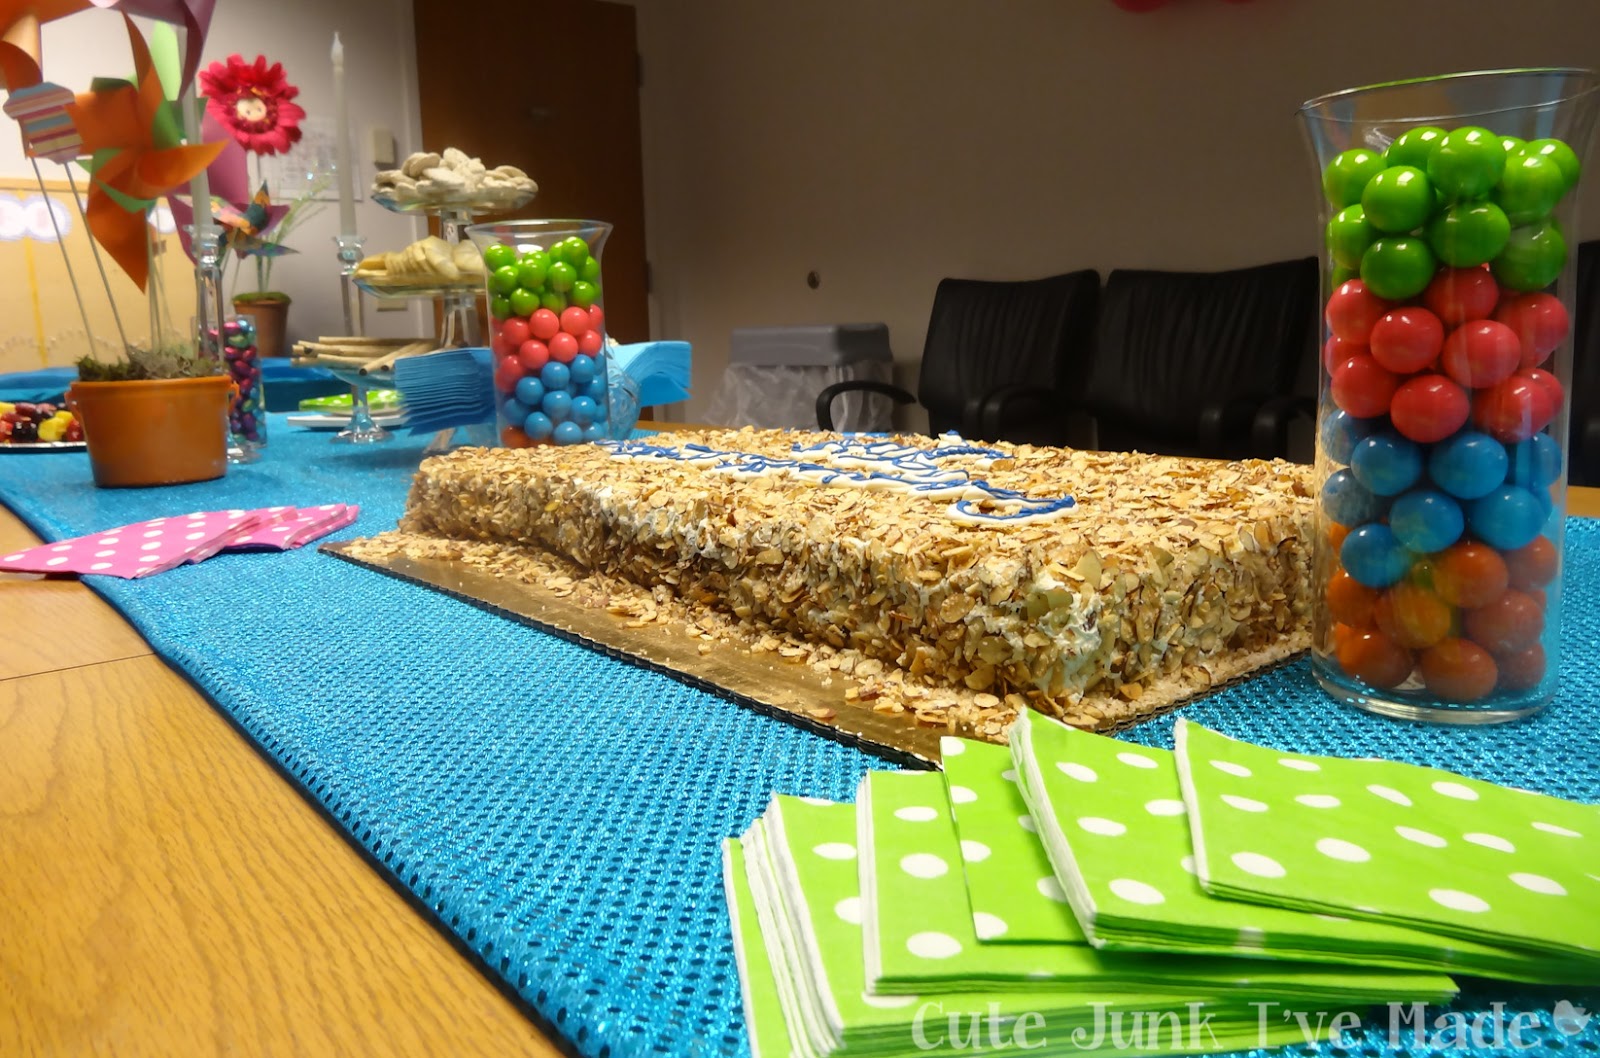
Here's the decorated conference room.  It goes to show even the dingiest office conference room can be a great setting for a party!


Check out those artfully arranged forks!  That is all Joanie!

Get it?  An umbrella for a shower??  Get it!!


All in all, it was a fun time and we had a blast decorating for this shower!  If you use the printable baby shower banner or the printable Bow or Beau game, I'd love to see them in action!

If you'd like a blank version of the invite to customize yourself, I'd be happy pass it along, just email me!

Linking up, where else?
Photobucket

Tuesday, April 16, 2013

How to Make Horchata

Cute Junk I've Made | How to Make Horchata

While Dude and I were in Arizona, I had my very first taste of horchata at a teeny Mexican restaurant called Moreno's.  If you've never had it, horchata is this amazing milky, kinda spicy drink made from rice.  If you like chai tea, you'll love horchata. 

Since we got back to Pittsburgh, I've been dying to find some really good horchata and have been failing at every turn. 

I tried the grocery store boxed version and it tasted like milk water that had been fermenting inside of a gym sock. 

We've been to three different "authentic" Mexican restaurants (as authentic as you can get in Pittsburgh) and only one offered horchata and it was not great. 

After that last failed attempt to purchase horchata, I gave up and decided to make some myself. 

Making your own horchata is insanely simple.  It requires ingredients that you probably have in your pantry right now and no special equipment other than a big jar and a blender.


Tuesday, March 26, 2013

Simple Spring Wreath + FREE Printable!


Truth time:  I just took down the Christmas wreath from my front door last weekend. 

In my defense, it was just green and snowy and had pinecones all over it so it wasn’t exactly “Christmas-y.” 

But still.  I started to feel like our mailman was judging my decorating abilities ever since my “Let It Snow” banner stayed up until it was literally falling apart.

Seriously, I found one of the letters in my neighbor’s yard.

Anyways, so I dug through my craft stash closet in out attic looking for something bright and springy and found this.

Source

Ok, not exactly this one but a grape vine wreath I bought I think last spring.  Who knows what project I was planning that never got started...

Anyways, I found the wreath and the wheels started churning.  I was thinking bright colors, maybe some rosettes and definitely the word “SPRING” somewhere. 

So late last week I made this cute little spring banner. 


Then I strung it up on some twine, using the handy-dandy tabs at the top.  I made these tabs primarily because I can’t find my stupid hole punch.  Feel free to cut them off if you prefer to punch holes instead. 


Then I made some rosettes out of scrapbook paper and leftover fabric and hot glued them on.  I won't tell you how I made them because there are better tutorials than I could ever give all over the interwebs.  But if you need some help, check these out:    


Finally, I added a little band along the left-hand side for color.  I liked it when I put it on, but looking at the pictures now, I may take it off.  


And there you have it!  Super simple, quick and easy spring wreath.


If you’d like to make your own, grab a copy of my printable spring banner here.  There is a large version and a small version.  The small is good for a wreath like mine, the large is good for hanging in a small window or at work.

Have fun and happy crafting!


Background music for this project:  Buffy the Vampire Slayer – Season 7, Episode 8: Sleeper 

As usual, linking up to my favorite linky parties!
Lil’ Mrs. Tori

Thursday, March 21, 2013

One and Done: Homemade Burp Cloths

One-Hour Burp Cloths | Cute Junk I've Made

Seems like everyone and their sister - including Dude's sister! - is pregnant right now so I've been going crazy pinning projects I want to make for everyone.  I pinned a variation of these super simple burp cloths by Dana at Made ages ago but just this weekend I finally busted out my sewing machine to whip up a few.

It's tough for me to pinpoint my favorite thing about these burp cloths.  It could be the fact that they take maybe 10 minutes to put together, or the fact that they look and feel much more expensive than they really are.  But really I think my favorite thing is that they stand alone as a great baby shower gift, and make you look like a freaking rockstar if you include them with another store-bought gift.

So anyways, all you really need to make 12 of these cute burp cloths is a yard of chenille fabric and 1/2 yard each of as many coordinating fabrics as you like.  You can use silk, cotton, knit, flannel, whatever tickles your fancy.  I was able to squeeze 3 out of each coordinating fabric with barely any leftover fabric.

One-Hour Burp Cloths - Fabric Needed
Because these burp cloths are so small, take a look through your scrap bin for fabrics you can use as well.  Look at what I was able to find in my scraps!

One-Hour Burp Cloths - Fabric Scraps

How adorable are those girly skulls?

So here comes the hardest part.  Measure out as many 10" x 18" rectangles as you can on your chenille.  I went a little old-school geometry here and measured out 10", dropped the tape measure an inch, measured again, and so on until I had gone the entire length of the fabric.  Then connected all my little marks.

One-Hour Burp Cloths - Measure 10"


Repeat going the other direction for 18".

One-Hour Burp Cloths - Measure 18"

Now repeat the same procedure with your coordinating fabrics until you have a giant stack of 10" x 18" rectangles.

One-Hour Burp Cloths - Pile of 10x18" rectangles
If you can't read it, the chili peppers are saying "Caliente!"  Adorbs.
Pin one rectangle of the chenille and one rectangle of your coordinating fabric right sides together.  If you'd like to include an extra layer of absorbent fabric, it should go on top of your coordinating fabric.

One-Hour Burp Cloths - Chenille and coordinating fabric pinned together

Leave a gap in the pins on one of the short ends.  You'll use this gap to turn the burp cloths right side out later.

One-Hour Burp Cloths - Gap in pins

Sew around the edge of cloths.  Using the picture as a reference, I started at the pink pin on the left, sewed the entire way around without stopping and ended up back at the mint-colored pin.

I sewed a pretty large seam allowance on this one, and it absolutely wasn't necessary, but it also didn't hinder the cloth either.  These burp cloths are pretty forgiving.

One-Hour Burp Cloths - First pass with sewing machine
 
Snip off the corners so when you turn it right-side out, you'll have perfect corners with no extra foofy-ness.  That's a technical term.

One-Hour Burp Cloths - Corners trimmed

Using the gap in your sewing, flip the entire cloth right-side out.

One-Hour Burp Cloths - Turned right side out, fabric on top

Fold in the edges of the gap and iron it.  You can pin the edges in place if you think they need it.

One-Hour Burp Cloths - Right side out gap, edges folded under

One-Hour Burp Cloths - Ironing the gap

Sew around the edges one more time and seal up the gap.  Sew as close or as far from the edge as you'd like, so long as you still catch the extra fabric along the gap.

A decorative topstitch would be really cute here too!

One-Hour Burp Cloths - Finished burp cloths, folded in half

Ta-Da!  Donesky!

One-Hour Burp Cloths - Finished burp cloths tied up

One-Hour Burp Cloths - Finished burp cloths close up of chenille side

Close up of the super-snuggly fuzzy side!

For my co-worker's shower this week, I wrapped up three with a piece of coordinating ribbon and added a bottle of natural baby lotion I happened to have on hand. 

Must have been on sale?

One-Hour Burp Cloths - Finished burp cloths wrapped up as a gift with lotion

Linking up to my fave linky party:
Photobucket

Background Noise for This Project:  Girls, Season 1:  Episode 7: Welcome to Bushwick a.k.a. The Crackcident, Episode 8: Weirdos Need Girlfriends Too

Sunday, March 17, 2013

Spring Cleaning: The Bedrooms - How to Clean & Freshen Your Mattress

Spring Cleaning:  The Bedrooms | Cute Junk I've Made

Next up in my Spring Cleaning:  The Bedrooms series is how to clean and freshen your mattress.  Unlike the pillows, this tutorial doesn't have an astounding before and after shot.  But what I do have is this.

Spring Cleaning - Dirty Vacuum

That, my friends, is what I vacuumed off of our mattress after cleaning it.

Gross motivation.  If this doesn't get you going, I don't know what will.

Saturday, March 16, 2013

Spring Cleaning: The Bedrooms - How To Wash Your Pillows

Spring Cleaning:  The Bedrooms | Cute Junk I've Made


Ok, who else is enjoying some gorgeous springtime weather??  It seems like as soon as I start to see some sunshine, I am reminded of how dirty I’ve let my house get over the winter.  The dust on the windowsills is suddenly more apparent, Pepper and Zeke are shedding fools, which results in tufts of fur rolling across the kitchen floor like tumbleweeds, and the air inside the house seems so stale with the windows closed.

So as soon as Daylight Savings Time hits (Or is it ends?  I can never remember.), I know it’s time to start my spring cleaning.  Now, I know there are bajillions of better bloggers than me out there (here, here, here) detailing their extremely awesome spring cleaning schedules.  That’s not what this post is about. 

This post is about getting your home cleaner.  It’s about cleaning things that are usually overlooked.  It’s about learning some gross facts that will motivate you into cleaning these overlooked things.

This week, I’m focusing on the bedrooms in my house.  I’m talking specifically the beds themselves – the pillows, the duvets and comforters, and the mattresses.

Did you know, over their lifetime, pillows can absorb THREE TIMES their weight in dust, dead skin cells, hair, sweat, bacteria and other yuckies? 

I’m sorry I had to share that with you.

Not really, you needed to know so you’d follow this tutorial and wash your pillows.

Wednesday, March 13, 2013

Wedding Wednesday: The One Where I Make A Budget

In the hopes of not completely saturating this blog with wedding garbage, I'm going to attempt to limit myself one day (Wednesday, because I adore alliteration) per week for wedding stuff.

Wedding Wednesday with Cute Junk I've Made Graphic

I'm planning on doing a decent amount of DIY projects for this wedding that include:
  • Will You Be My Bridesmaid Box (dress cookies, bridesmaid hangers, note insert)
  • Save-the-Dates
  • Invitations (design and putting them together)
  • Programs
  • Reception Signage (menus, table numbers, escort cards)
  • Centerpieces
  • Fabric bouquets and boutonnieres - If we're being honest, this may never happen, depending on how good my fabric flower creating skills are
  • Favors (stickers, cookie display)
  • Bridal accessories (headpiece, bling-y belt/sash)
  • Out of Town Guest gift bags (door hangers, map, other?)
  • Other??
I'm deluding myself and saying that since we have roughly 18 months until the "big day," that I can easily complete every single one of these projects.

I've read too many Wedding Bee posts to think this is even remotely true, but damned if I'm not going to try!

In any case, I've recently started looking into...well...everything.  And I am beyond overwhelmed at how much everything costs!

I know every bride says this.

So, being the list-making, perfectionist, a-type person I am, I knew before we could do anything, even before we started a guest list, we needed to make a budget.

I made an Excel spreadsheet that included every single expense I could think of associated with a wedding, right down to my 3 days before cooter waxing.

Once I did that, I separated everything into groups, added a couple of formulas and ta-da!  My wedding budget spreadsheet was born!

The great thing about this spreadsheet is that I can keep track of everything in it.

There's a tab for the budget, which keeps track of every expense and there's even a column that calculates when each item should be completed. 

There's a tab for the guest list, which includes columns to enter each guest's address to create a mail merge for addressing envelopes.  There are also extra columns to keep track of received RSVPs.

And since I love you, I'm going to share this gorgeous Excel work of art with every single one of you!  Feel free to make changes to it to suit your needs.  To update the "Appt Made" column, change the wedding date at the very top (A2) to your date.  Everything else will populate itself.  Technology at its finest!

To download the budget spreadsheet for yourself click here.

If you use the spreadsheet, let me know how it works for you!  If there's something I blatantly missed, shoot me a message or leave a comment and I'll be glad to update it!

Background Noise for This Project:  Ed Sheeran/Cher Lloyd Pandora Station

Pin It